Thursday, January 23, 2014

winding coils, rfc

 Winding the RFC..


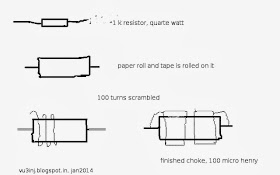
One 100 micro henry rfc was needed for VWN tx. wound it but it did not work in the tx. I was puzzled. Finally found out that the resister of 2watt was wire wound type. So it itself was an inductor. When two inductors are placed in paralled it reduces the inductance.... Thus , we need  a carbon variety here. Carbon resistors are non inductive. All quarter watt, half watt resistors are having carbon material.

I bought resistor from  shop,  he said it is carbon but on scrapping the cover, revealed contrary. Touch the resistor with nail. If there is few road bumps, it is wire wound. A quarter watt carbon resistor is used but its diameter is very small, so few rolls of paper is cut and rolled over this resister which makes it thick enough.

A thin wire removed from the CFL bulbs transformer is taken may be about 40 swg. It is really thin and brittle so easily breaking.

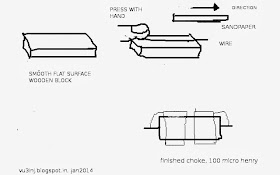
As shown above the choke coil is wound. For scraping the insulations one small used emery-paper is utilized. Here the torch,heat, file does not work. That finished the rfc. Measured in total 220 turns (100 plus 120) gives me inductance of 97.6 micro-henry. Mission accomplished.


Thats is folks ! wheel has been re-invented.

Wednesday, January 22, 2014

RM 96

After making (not using) the vwn 40 meter tx, bitx and few cw qrp tx i thought it is time for making something which works on the air and not just heat up the dummy load and radiate within a few km. So, it was time to make a high power amplifier chain which can be usuable for all ham bands not just one freq.
The amplifier chain used in the RM96 and ATS-1 .HMY2K8 etc are the direct derivatives of the ARRL design which has been reproduced successfully world over by lots of hams. but when i searched for the intrincik write-up, not found . so, asked few of the ham friends to provide me their success stories and foto of their rigs.
One of my friend vu3kod, OM Puranic has successfully made the rm96 and as designed by the vu2rm and used it extensively. He has send me this pictures. It looks great. He also gave me the insight of FET RF PA stage. thanks VU3KOD.
vu3kod, rm96

vu3kod, rm96


Saturday, January 18, 2014

QRT

QRT
qrp........any of the days i will be signing off, there is no ham in my city to even just give me a signal report. wow !

For VHF I am qrt.

For HF due to the kind efforts of many ham friends I will be on air. 14315kc,14195kc... (as of 27jan2015)

QSO GETTER


Wednesday, January 15, 2014

tribute to vu2jn


It is really geneous of OM's designes. I was amazed at the loading of pa coils. in this age of transistor i did not encounter this type of loading arrangement.

Tuesday, January 14, 2014

DDS VFO

dds vfo without pic
I have seen this ckt diagram on the hanssumers website.

http://www.hanssummers.com/dds.html

We also have the ready made AD9850 or AD9851 modules available in the ebay and from hams. Sometime we need just one spot frequency and xtals are not available or economical. If anyone can help me make the ckt modifications for the ebay module, it will be a great help to all community. It is not economical to buy the IC alone. Readymade modules costs less..... please modify the ckt for ebay modules......

Well, my request on the facebook did give me few inputs. 

I got one very positive thing from riyas vettukatti

Riyas Vettukattil I guess you can use it with ebay modules. For eg if you want to make a fixed frq of 7050, calculate the 32bit freq word by going to http://designtools.analog.com/dtDDSWeb/dtDDSMain.aspx (choose ad9850) and the circuit above does the job of loading a 40bit (last 8 for phase is constant from Q0 output from the 4017) These DIP switches can be toggled to make a binary representation of freq eg : 7049.99 = [00001110 01110000 00111010 11111011] good luck Indrajit Sinh with tweaking..

then,Om Niras VU3CNS,  also gave one point that it is possible to port this thing to the ebay module. 

From ebay there are two modules. the modules i use is as given below. first one.
AD9850 modules


 Another ham has used this module with microprocessor but, here i am concerned with pin layout of the ebay ad9850 module.

The ebay module contains 125 mhz oscillator, rf filter. so what we have to do is give the controll words, clock etc. beauty of this module is that all the data pins D0 to D7 are in single line. so , easy to use, in the ic these things are on different pins. A single ic cost more than the module cost. Ic being in a small package is very difficult to solder on pcboard. So, it is nice to have ready made thing.

This is the famous dds60 daughter board. for the information i have put it here. 


*********************************************************************
THEN browsing on the net i got two little write-ups.May be that will be also useful reading. Time proven cut, copy, paste tech is used.

 1. from website www.theladderline.com

 ...AD9850 DDS modules
Submitted by VE2UM (not verified) on Wed, 11/09/2011 - 07:09. Nov 09 2011
Hi...

I discovered REALLY CHEAP AD9850 DDS modules on eBay...

Simply goto EBAY and type: DDS module

There ate PLENTY of them !!!!

There are more expensive COMPLETE signal generators at around 60 $ but the modules i talk about are the ones with a square blue pot, a square 125 MHz quartz oscillator and an LED close to the oscillator. Those modules can be bought for less than 12 $. I bought one of them, breadboarded it with a PIC12F1840 for initial tests (serial access) and it works great !

The only problem is that documentation on the modules is inexistent. I examined the module and found this pinout (quartz oscillator on the LEFT)

Top and bottom rows:

Vdd D0 D1 D2 D3 D4 D5 D6 D7 GND

Vdd CLK Latch DATA RST GND SQW SQW SinA SinB

Vdd is +5V (chip can work at 3v3 but not guaranteed to work at 125MHz)

D0 - D7 = Parallel programming bits

GND = Ground (obvious); Vss

CLK = Serial programming clock
Latch = Serial programming latch (FQ_UD pin on 9850)
DATA = Serial programming DATA (internally tied to D7)
RST = Reset. Keep tied to GND
SQW = Square wave outputs (complementary) Duty cycle adjustable with blue pot.
SINA = Raw unfiltered AD9850 sine output
SINB = 70 MHz LPF filtered AD9850 output.

I only tried serial programming. For that purpose, D0 and D1 should be tied to Vdd and D2, to Vss. Keep D7 open, I left D2 - D6 open, but note sure about recommended pin status.

The format is:

W0 W1 W2 W3 W4 W5 ------------- W28 W29 W30 W31 0 0 0 0 0 0 0 0

The frequency word has 32 bits, W0 is the LSB and W31, the MSB. W0 is sent first.

The last 8 zeroes are for the two control bitys (keep at "0"), the powerdown bit (keep also at "0") and the five phase bits that i keet at "0" for now.

The frequency word calculation is:

WORD = Frequency * 4 294 967 296 / 125 000 000

I used 125 000 000 for the nominal quartz frequency. The quartz oscillator in not a TCXO and is NOT adjustable. For greater accuracy, you shall read the actual quartz frequency and use it in the formula.

Example: for 3750 kHz: WORD = 3 750 000 * 4 294 967 296 / 125 000 000 = 128 849 019

in HEX: 07 AE 14 7B.

The frequency resolution is 0,03492 Hz, so you can build a really smooth VFO with the AD9850.

Remember: This is a DDS. While the signal is not bad (use the filtered SinB signal), it is not perfect. If you want to get on the air, you will need a lowpass filter for your band to prevent interference.

*********************************************************************
-then another write-up is here
---AD7C
I was browsing eBay one day and I ran across a posting for the Analog Devices AD9850. The AD9850 is a chip that can produce a sinusoidal wave from about 1hz to 40mhz. Somehow the electronics dealers in Hong Kong have been able to mate the chip to a small board that provides TTL level control and then sell it for an unbelievable $8 (or less!). I know a few people have paid as little as $4 (USD) for them.

AD9850 Module-

To control the AD9850 you’ll need some sort of micro-controller.  Without going into too much detail you are required to send a set of serial or parallel data to the chip to set the frequency.  There are numerous postings on the web detailing exactly how to do this so I won’t go into too much detail. However it has been hard to find a good AD9850 Pinout so here you go.

D0 – D7 = Parallel programming bits
GND = Ground (obvious); Vss
CLK = Serial programming clock
Latch = Serial programming latch (FQ_UD pin on 9850)
DATA = Serial programming DATA (internally tied to D7)
RST = Reset. Keep tied to GND
SQW = Square wave outputs (complementary) Duty cycle adjustable with blue pot.
SINA = Raw unfiltered AD9850 sine output
SINB = 70 MHz LPF filtered AD9850 output.

*************************************************************************

Now,enought of theory and it is time to solder the DIP Switch and then go for this ebay module.

Today 22 Jan 2014 around 2230 ist ,my friend rias gave me a link on his webpage where he has tidy-up the ckt removing the QRSS part. his address is http://blog.riyas.org/

dds vfo without micro-processor

Now, soldering and end result will be published may be within a week. 
25Jan2014 I was very busy in the family and Mqth so could not start soldering. As the first phase diode matrix is ready.
In the vero boards there was not enough space, so i had to join the  two 2030 modules. all diodes have been given the enough spacing so that it can be soldered but on switch8 diode is mounted vertically as there was lack of one dot space ! I have not soldered the DIP SWITCH with the intentions to use it somewhere else if the project fails. It also facilitate the easy switching. 16 pin Ic pad is soldered, so that soldering becomes easy. Care has been taken to put diodes corretly one by one. Put it, solder it, test it. then go for other diodes. so it was a very tedious task. it took me more than two hours time. once done will solder the gate oscillator and counter ics. So this will become my diode matrix for dds vfo controll.  please wait.......


 1 feb 2014:- Progress is steady but slow. finished up the diode matrix. oscillators. Now connection between two pc boards is to be done. drawn the module top side view. This module has the beauty that all the parallel data port is one side and diode matrix  also  matches it. wow !

Now, power supply needs to be made for 3.3v dds board and 5 volts for 4017 board.

 As of 05feb2014 finished almost all the wiring. I hope when this works a pcb is made so within an hour this can be soldered and usable.

Still needs to figure out what is the LSB and MSB and wethere 3.3volts to ebay module and 5volts to the counter ic will work or not.I hope it becomes reality and then with it will try to run a homebrew dsb transmitter.


8Feb2014
 

Results is:- Working. End of all my doubts. Ebay module is also working. This is a lengthy and tiresome work, making it on veroboard. It is better done on a etched pcb and within an hour it can be up and running. Will ask someone to make pcb. First problem low frequency oscillator(74hc04)and counter (74hc4017) is little wobbly. needs to be retuned or redesigned with other parts.
It works. All fine details and how to run it, will be uploaded after making few  more test and based on further experiments results. Will upload the circuit diagram.

End of the post. thanks for being with me.

Thats it folks ! we have just tried to re-invented the wheel. :) but failed....
have look at second part at
http://vu3inj.blogspot.in/2014/02/dds-vfo-ckt.html

Sunday, January 12, 2014

MOSFET AMP IRF510, a little discussions.

During the re-inventing the wheel i came accoss one peculiar problem, so asked the groups. In this OM Charudutt -VU2UPX, OM SandeepLohia, VU2KD -OM sofi, OM Jishnu, OM Vaidyanathan Prv, OM Rajesh Kumar,  OM Kaustav saha et al responded to my post.

The edited conversion was is as under. I hope it will be useful to future homebrewer and learn from my experience , understand the pitfalls and make a wise decesions.
(The transmitter write-up is here http://vu3inj.blogspot.in/2013/12/dsb-transmitter-xtal-14318kc.html )
It started like this:-

I have a trivial question to ask. When i drive the FET IRF510 on 20 meter band amp with 1.2 v gate bias and when i increase the gate bias voltage to abt 3 volts in between this region there is very high distortion. on first position dummy load become warm and receiver placed 10 feet apart likes the sound in second case the heatsink becomes the warm and dummy load becomes happy. receiver makes little difference in sound. In your opinion what bias voltage should be kept 1.2vdc or abt 3 volt. I also added that amp chain is being powered with 12v dc.

First reply came from Charudatt Uplap that Sandeep Lohia will surely be there to help.

Jishnu Nambissan also made a good point:-as far as I know , MOSFETs are unhappy to work in linear region ( increased heating ) ..... the transition from cutoff to saturation takes place around some 2 to 4 V (Plz refer data sheet) ... the MOSFET will be unhappy to work in this region ................

Vaidyanathan Prv advised not to talk in terms of (gate) voltage for biasing the FET IRF 510. When the device is used as a linear amplifier, set the bias in the gate to get 10- 15 ma in the drain( idle current) for push pull amp,and 50-60ma for single ended.therefore bias should not be referred to as gate voltage but only in terns of idle current Because no two units are similar we use separate pre set pots to bias the devices in push pull to get identical idle currents. IRF510, like the other power fETs is NOT intended for for linear duty.it is a switching device only. Linear operation is therefore, only compromise..so we have to tolerate the device for all mis behaviours..hi . (I think this is useful for the PUSH-PULL amp but we are talking here about the single ended PA... but he also has made a valid point on FET characteristic)

Sandeep Lohia :-I agree with Vaidyanathan Prv but again that is only suitable in case of close to 50 ohm proper load...

For U Indrajit I suggest : slowely increase gate voltage to a threshold, and stop just below where FET starts self-oscillating.

First tune your antenna & hombrew a RF probe... mis behaviour can be nulled somewhat using negativ feedback...

Try replacing IRF 510 with any other BJT-2SC1969, RD16HHF1 at your own risk.
(well i will not try other things as we want to use this fet only due to universal availabilty and cheap Rs17. The RD16HHF1 cost more)

Indrajit Sinh::- Thanks guys, i have put the IRF bias on first position and it gives me max clear rf output. ( This is the practical thing i wanted to know and this is what i have observed during the brewing.)

as said by lohia ji that is the point from where IRF starts misbehaving,,, let me also tell you that by increasing drain supply voltage (24vdc) to FET stage only POWER AND quality increased..... so thats it. i have re-invented the wheel ! EUREKA.....

As my first query was fully satisfied i put up the second query:- i have a question pa stage current remains constant at 22vdc around 550 ma as measured in the digital multimeter it is not showing increase as i speak ! it is ok .... or should i use the ameter (with dial). ( what i wanted to convery was the flicker of current , rise and fall of current sympathetic to voice peaks )

Answer came from Sandeep Lohia ? pa current constant not showing increase while speak/whistle??? Cheq ECM... No it not OK, this is what we call self-oscillation  With 22 VDD output impedance 'Z' drop to approx 32 ohm... Here U need re-think 1:4 autotransformer  , or simply use a 'PI' network @ output as used in tubes...

Md Sofi :-Dear Indrajit .In BITX linear board one jumper which is connected with IRF510 Drain,open the jumper placed the digital ammeter,apply the voltage regulated up to 30 volts DC.Set the current 30 mAmp help of 10K preset on board .Now connect the BITX exciter board to linear board,on the above condition you get more than 15 watts output.You never found any distortion in this case,if your drive signal is less and try to get more output by increasing volts at gate point it will heated up and distortion produced


Sandeep Lohia:- Sofi Sahab with 30 volt input & 15 watt RF we need 1:9 autotransformer (triflar) @ output, & not 1:4 as used in BITX...

Md Sofi :- in my case using SMPS 24V 5Amp power supply for linear only.

Indrajit Sinh :- Md Sofi ji has rightly pointed out the problem i was facing. there is no sufficient drive from driver stage. I am not using the bitx board. I am using the 22 vdc only. As pointed out by Lohia ji of impedance of transnformer is right. 

I think i have reached with this design on a point where power can not be increased without further changes. So, i leave it as it is.

will try to change the xtal as suggested by lohiaji and put it on air and see how far it goes and all the effort was worth it or not. As it is a dsb tx only half of rf is useful. Will box it , make an external single ended FET840 amp driven by this whole dsb tx.i hope to upload few pics on blog for your observations.

Sandeep Lohia IRF840 has very high gate capacitance...For 20M not suitable

Indrajit Sinh ::-it means maximum platue in this project is achieved and only things remains is LPF, ATU and antenna side efforts.

I have further observed that the air core toroid design given by the  VU2ESE OM Farhan in his first version of bitx tcvr is a very good one. It is usable for 5 watt level. In my ckt due to small size of wire SWG36 on high current it heats up. I have used the wire slavaged from CFL lamps transformer so insulation was good. Lohiaji suggested to use ferrite core when we are using more power. Power calculation for RF transformer is given in the RM-96 pdf. There push-pull amplifier set-up process is also given by VU2RM.

I wanted to make a small DSB transmitter using readily available xtal 14.318kc, which i have successfully made and hope that this will  usefull to hams. At present there is no confirmed QSL report. If you make this please make it at your own risk. I have not designed any pcb. All parts are soldered on veroboards. Through mechanical stability was given importance. Nothing should be loose. Heatsink is slavaged from other commercial prduct.I am improvising it. Will make a first QSO and tell you. Originally this tx idea was taken from many other designs and this is the final ckt.I tried a bit and pieces from different design and whatever works for me was taken as mine.

Theoretically,  same circuit can be used for 40 meter only change needs is tune amp and change of xtal. I hope to make a tuned amp for 40 meter and use it with 28.322kc and 14.318 kc xtal by dividing its frequency digitally and using the filters.so can be used for the two band.

Please note this tx runs on the 14316kc.

Thats it folks wheels have been re-invented. Enjoy.

Saturday, January 11, 2014

VXO, XTAL OSC

vxo
VXO

Xtals are used from the begining of radio era, as a very stable fixed frequency oscillators. They are easy to use, but when time comes to park them within a few KHz of their frequency, it is a different matter. Now, we have a method to shift the frequency without affecting the stability of it. It is called variable xtal oscillator or VXO. And there is another sub variety also, which is called Super VXO -with greater shift in the frequency.

Our concerne here is to shift the VXO frequency, so that we are able to receive the CW and SSB signal in the receiver when Xtal (ladder) filter is used. 

I have used the collpitt oscillator.  The ckt are given in figure below. fig-1. Only difference between normal collpitt oscillator is that a trimmer or a varable capacitor is put there. wchich shifts the freq to upper side. can be used as a LO of USB. Lower the capacitance higher the frequency. increase the capacitance and frequency decreases. 


In low freq range generally shift of around 400Hz is observed for 4Mhz xtal . High freq xtal of10Mhz and up have 4000 Hz shift.  For the 28 mhz fundamental xtal shift might be much higher. With super vxo these shift can be increaed further.
 
In fig.2 . Inductance is used to pull the frequency a little lower. (Lsb).
If we are using this as BFO without inductor and freq is 10000 kc we can pull it to 09999 kc using inductor, so we got a 1 Kc shift for cw receiving. By using the variable capacitor (generally called gang) or trimmers osc freq can be increased in updirections. (Usb) Please not that if you have xtal of 14318kc it is oscillating between 14313.6 kc and 14316.6 kc. now lower limit can be made 14313kc and higher limit can be around 14316 kc. see the difference of freq remain same but only shift in the range usable. Please not that it can not increase beyound the freq marked on Xtal .

How much your xtals will pull ? Test it by connecting the vc and xtal and no inductance and see FIG.1 and measure the shift in freq. This is the range you will get from the design and nothing more. If use two xtal in parallel freq. range will increase slightly. Use of the inductance has the limit, if you use large inductance, unshielded inductance then is does not remain vxo it become LC oscillator. You can use any Coil without internal capacitor. i used 10MHz if can, by crushing its internal capacitor. Please ground the xtals and cans body. Also use use the some knob for variable capacitor if using gang. due to close proximity to the gang there was slight change in freq observed in counter.

parts list:-R1-100k, R2-1k, R3-100 ohm, C1 &C2 about 100pf,it depends on the type of xtal holder hc-69 and halfsize chinese hc69 likes the 100pf and on lower freq say 3.579, 4.000 mhz xtal you can use 1000pf if xtal is big one. C3,C4-0.1mfd (104). regulated 12 v dc from LM7812 is used. L is generally found SIF of tV or you can try anything which has small inductance. air core is not tried. This osc stage feeds its output from emmiter to the buffer amplifier which is not shown here but can be found in blog somewhere.You can measure freq at emitter of this oscillator. Xtals are fundamental range over tone may not work.

thats it folks.
wheel is re-invented ! Now, enjoy.     

Friday, January 10, 2014

direct conversion receiver, DSB xtal 14318kc

direct conversion receiver ,20 meter 

vxo 14318kc


After finishing the direct conversion receiver based on the xtal oscillator 14318kc it is time to update it to the fully dsb/cw capable radio. Finished the brewing and following points observed....
1. There was hum in the radio may be due to the local qrm or band conditions. when computer was running nearby it disliked it and produced unbearable noise.
2. High gain pre-amp was not quite. i used bc 549c , it needs to be a quiter variety like bc108.
3.shielding of vxo is a must, as tuning is relatively sharp. I doubt without slow tuning vfo this type of rx can be difficult to tune-up for ssb.Here vc-gang provides enough slow tuning freq spread is about 3kc. Lower limit reached by L and higher limit by c.
4. Front end BPF needs to be a slug tuned core type or may be with air core coil but with a variable capacitor to adjust the bandpass characteristic. In the first receiver bpf was the problem. After putting this bpf all sw/am breakthrough deminished.

ckt will continue.....
Circuit is put into the box. Also a closeup view of the VXO is given how the variable capacitor is fixed with body.

Re-tuned up the rx and works ok for a CW morse practise receiver. I dont recomend it for a day to day serious use. As i was designing the TX based on the xtal a companion receiver was needed. I cant subject my main receiver to unruly transmitters harsh signal, so this was conceived. A good RF BPF  filter needs to be designed and put, so that am breakthrough does not come !

VXO close-up look


Inside view of DC Receiver

Wednesday, January 8, 2014

Tuning up the DC rx

Direct Conersion receiver based on the TA7358AP and xtal 14318kc. This xtal generally oscillates around 14313kc in this ckt.

Original post is here    http://vu3inj.blogspot.in/2013/11/14318-mhz-cw-direct-conversion-receiver.html

Tuning this receiver is a very straight forward affairs. You will need xtal oscillator as given in the sept2013 post. Make that and you will have an RF signal source. If possible use the different power supply to power this xtal osc and receiver. Please use the xtal of the same freq value.

In the rx check the power supply rail wether you are getting proper 12vdc or not. If you have put and led in the power rail instandtly you will know this. check also that ta7358 pin 9 is getting 5 volts and not more. Warning more voltages will damage this mixer ic. Also note the orientation of this ic. dont make mistake here. It will damage ic. On pin2 there is 0.1 (104) capacitor. Also chekc the freq atk pin 8 ,

Audio should be quite, there will be white noice hiss . (broad band shhhh sound is called white noice) now touch the base of first pre-amp the noice will increase. increase/decrease the volume and you will know that af chain bc547 and lm386 is working ok. IF motor boating sound comes on putting the volume in maximum position. then increase the feed back of preamp from 33 pf to 100pf. Now, there should be no motorboating and noice level will be quiter. also see that you use bc547b variety not the bc57c. suffix c has higest gain which can create problem here.

Now connect the one feet antenna or any small legth wire to rx input.

Power on the xtal osc. If you have general coverage radio (AM will suffice) you can know that your osc is indeed working. or measure freq with xtal. Now this xtal osc is working put it some distance and also connect one to two feet antenna for radiating the signal. ( both rx and tx antenna are different ones, there will be two antenna wire.)

at this point when your rx is switched on and xtal osc is also switched on you should hear the an audio note. swithc off the xtal osc and it should vanish. Tune the front end bandpass filter for more signal. If need arise keep your xtal osc farther from the rx and retune.

Connect the big antenna / dipole and sound should increase and if lucky there will be little or no broadcast station breakthrough.

If you dont hear the note now there is some problem.
Switch off everything.
Visually inspect the ckt diagrams, your ckt, ic pin orientations, also check power supply.

then test the speakers. LM386, bc547 stage and then rf amp and ta7358stage.
on connecting big antenna without any bandpass filter, you should be able to hear the am/sw stations this is sure sign of working of your dc receiver. by putting the bandpass filter (generally two tanks will be ok sometime you need to put thee tanks in front end.) ............... to be continued....

Tomorrow will be updating/editing this text and putting more fotos and sketches. also first time putting space for comments/your feedback , any dobts, comments etc.

Sunday, January 5, 2014

ATU


The resistive bride to detect the vswr is what i am making.  ( I made it but there was not enough power to drive it from my transmitter 27jan2015)

Then may be LC tuner will be used. Lets see.... tried this but did not work for me.


Meanwhile during LL qso, VU2KD suggested just put a two diodes and one vu-meter and tune the antenna for max deflections. Actually this shows the antenna voltage.  May be know something is going into the air.
simple tuning help.
I had the sked and talk about the antenna tuning issue of my qrp tx, cw and dsb with VU3YFD. he suggested the tuning up procedure and we had talk about the strip line, diode, homebrew swr meters. wow ! excerpts on the few words is .... ( will write down later on pls wait)

I was little sad, as i did not have swr meter and i brewed this much and tx not putting up on air. Earlier did not feel need for it ! wow. Searched the net I will sure to tune-up and be on air with this qrp rig, but anyway this is process of re-inventing the wheel , it will help lots other hams also. Theoretical knowledge is one thing and actually putting togather is a different thing. Ya, and this is the step towards it.......

Then i remembered my first rf sniffer probe. It has the similar ckt and tried it man-hattan style. put whatever was on hand and around 1pm put tx and rx on. c1-10pf, c2-33pf , r1-one megaohm,  LED. and did the test with cw and dsb tx. they show the light. next was done put  a capacitor in-between the output of rf amp and antenna and tuned for maximum brightness what i think and in rx also one s point increased. that means it was tuning up...... on daytime i tried this indicator and observed that due to dim light of LED without proper shielding or putting it in small empty bottle it is not possible to see the led light.....

then comes the experimental fsm.
This was the ckt 10 years ago i brewed as RF sniffer. exactly i dont remember but I will reverse engineer it from a old rf probe lying somewhere in my junk box. And when i transmit it went full bright.

when my dsb tx did not work, even the first birdge ckt did not work it was time to retrospect. PA is drawing up the current , dummy load is heating up, receiver is crying loud but does the antenna radiating fully ! FSM is a tool to see the answer in full scale or as bright light.


In first ckt there was false indications due to hand capacitance induced emf. so damped it with few more components and it shows the presence of rf as designed.

c1-10pf, c2-33pf, r1-10k preset,r2- 2k2, r3-470k,r4-10 ohm for overall current limiting. d1-d2 are 1n4148 diodes.

Then cw tx was connected to antenna. I placed this ckt near dipole, LED was full bright.  But with one or two feet apart it went dark. There was not much RF radiating from the antenna. There was not enough umphhh......

Now, i understood why people did not hear me on 14316kc dsb rig.

The antenna fine tuning / matching and one  RF Power Amplifier is needed.
( around Jan2015 made succesffully the single ended RF linearing using the IRF510/IRF840)
(Still ATU has been not made, so this is  pending work, may be later on................)